Monday, May 30, 2011

Not-So-Mellow Yellow

Remember how I said I was having trouble putting down the decoupage glue?

This $10 table was not only a lesson in paint stripping, but finished off the rest of my Elmer's from the dresser redo.  It was a hideous blue color when I found it.  But, I liked the shape and size.  So I picked up some paint stripper and thought, "How hard can this be...?"

12 hours, 10 coats of radioactive chemical, 9 blisters, one splash in the eye, and 5 different paint colors later, Blake and I uncovered this:


I actually kinda loved the distressed look that was the end result.  But I did want it to be yellow.  Blake put on a coat of the same yellow paint we used on the dresser's drawers, allowing some of the grain to show through.  It came out wonderfully shabby chic. 

And, using more scrapbook paper, I attached black and white images to the piece.  I think this has been my favorite redo so far.  (I'm going to have to do a blog solely on the various purposes of scrapbook paper.  I use it for everything.)


Oh, and see the coffee pot on the bottom?  I snagged that from my Granny's.  It's a Comet percolator, and I think it's about 50 years old.  So charming. 


Tuesday, May 24, 2011

Hello, I'm Johnny Cash.

I got this one piece atta time......well, not really, but it sounded fitting.


Blake and I are in love with classic country.  It reminds both of us of growing up in the rural south.  Nothing brings back good memories like hearing songs from Willie, Waylon, and the boys.  Recently we visited Memphis and toured Sun Studios.  Seeing as I'm also a huge Elvis fan, the whole experience was a mecca of sorts for us. (See our Memphis pictures here.)

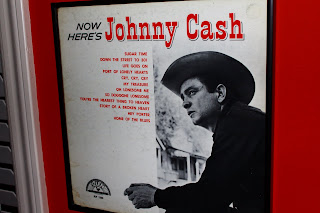
Imagine my delight when I ran across this vinyl for $12 at a junk store!  And, it's not just any album.  This record was released in 1961, just 4 years after the start of Mr. Cash's career. 

Of course, I had to prominently display this wonderful work of art and piece of musical history.  I had purchased a few album frames at Bed, Bath, and Beyond a few years ago (I think they were about $7 each), so I dug them out of the closet, and gave Johnny his new home.

Since the album itsself was so cool, I wanted to show it off.  I put it in a frame separately from the cover.  I fashioned a background out of scrapbook paper (I love that stuff!), and also stuck our ticket stubs from the Sun Studios tour in for good measure. 

I like to think about who might have been listening to this record 50 years ago, what their life was like, and the path this album took from Sun Records to our wall.  I can almost hear the "boom-chicka-boom-chicka-boom" and Johnny's deep voice calling, "Hello, I'm Johnny Cash." 


Monday, May 23, 2011

What Light Through Yonder Window Breaks?

It's a vintage window, in my bedroom!


Now, before I go waxing poetic and taking the credit for this idea, I have to give props to my mom for inspiring this piece.  Long before it was en vogue to have old, creaky remains of quarantined houses hanging around, my mom collected old curios and proudly displayed them around our house.  "Look, kids, I found this old cracker canister half buried by the pond!"  My brother and I would roll our eyes and not-so-discreetly make fun of Tootse (as we called my mother) for being soooo "countryful".  Anyway, I remember mom coming home with an old window several years ago, and me asking, "Why are you hanging a window on the wall when there's no hole there for it?" 

Now that I'm an adult, I've embraced my mother's ability to see a beautiful piece of decor in something that might have been thrown away otherwise.  I picked up two old windows last weekend for $24.  After spit-shining them a bit (and a very close encounter with a live black widow), I decided to make use of the trillions of photos I've collected.  I mounted three 5x7 pictures on scrapbook paper with a glue stick, then used invisible tape to stick them to the backside of the glass.  Blake installed the appropriate hanging hardware (glad he's handy like that), and then hung my masterpiece in our bedroom.  I do know this:  he had to find studs for the nails holding the frame, 'cause that thing is HEAVY.  I love that's it's already perfectly distressed.  No faux destruction necessary.


The second window will be adorning the man-cave shortly.  Blake hasn't hung it yet, but I used the same concept, except went with an old Chevy theme.


Simple, cheap, and cute.  Just my style. 

Birthday Party on a Budget

My daughter Skyler turned 10 a couple weeks ago.  She's at that in-between age....too old for Dora and Barney (but oh, my, how she used to adore them); too young for teenage stuff (thank goodness).  I wanted to get creative with the theme, so she and I decided to host a Paparazzi Party.  Essentially, all the girls dressed up in their most glamourous outfits, put on makeup, and I styled their hair.  I played tween music while 5 miniature drama queens primped in my master bathroom.  (Blake hid out in the garage).  Then, I took pics.  Lots of pics.  If you know me personally, you'll know that I just had a little bit of trouble taking my index finger off the shutter button.  Anyway, the girls had a blast, and while they were winding down -- uh, did I just say that?--, I uploaded their photos, printed them, and framed them for a one-of-a-kind party favor.

I got these picture frames at Wal-Mart for about $1.25 each, personalized them with my trusty Paint Pens, and sent Skyler's guests home with a party favor I was proud of.  Cheap, easy, and adored by raging 10 year old maniacs.  What's not to like?

Sunday, May 22, 2011

Delapidated Dresser Gets Decoupage

When my husband and I combined households, we had a few (*cough*) extra pieces that we wondered what to do with/where to put them.  This dresser had been in storage for ages, and was looking a little worse for the wear, having been subjected to the loving abuse his 8-year-old daughter.  Alas, it ended up in the corner of Blake's man-cave (as he insists on referring to our garage). 

We needed more storage, no contest.  So, together we set out to fix up this little monster. 


After a good sanding and a couple coats of paint, we had a beautiful piece to adorn our children's room.  (By the way, I love Behr's paint that already has the primer mixed in.)  Suddenly, I got inspired and decided to decoupage the drawer fronts.  After picking up some cheap books at a local flea market, I cut some maps out of a vintage atlas, pasted 'em on, and sealed with a coat of polyurethane.

Who would have guessed that we almost used this as firewood?!


As I see it, this was a win-win situation.  The kids get more storage space, Blake gets the corner of his man-cave back, and I get the satisfaction of knowing I salvaged a pitiful hunk of wood, turning it into something cute and useful.  Even better, the entire project cost less than $50. 

I'm having trouble putting the decoupage glue down now. 

Putting My OCD to Good Use.

I have a tendency to get a little, um, obsessed with things.  I've been thinking about starting a blog for some time, but the question of "what do I have to blog about?" loomed in my head.  Recently, I realized I have a lot to blog about, namely, topics that fill the minds of mothers.  My husband and I have a blended family with four children total.  Our lives are colorful, wonderful, and full, yet stressed, hectic, and chaotic at times.  Often, I have admired magazines full of beautiful pieces of furnuiture, art, photographs, etc. and thought, "I could do that!"  I'm here to encourage you that YES, you can do that, and you can probably do "that" for twenty bucks instead of $500. 

I'll be sharing some of my cheap decor redo ideas, ways to organize the belongings of Noah's Ark into a suburban home, and unique projects I've found on my friends' blogs.  In return, I want to hear your ideas, too....after all, strength comes in numbers!